Surprise! An ELM327 tool can read the 1996-1997 Volvo 850 vehicle mileage, the 1997-1998 S70/V70/C70/XC70 vehicle mileage, the Service Reminder counters and counter limits that determine when the Service light illuminates, and it can read some other data maintained by the Instrument Panel (aka, Instrument Cluster, or COMBI).
The contention that an ELM327-compatible device can read the '96-'98 Volvo 850 / S70 / V70 / C70 / XC70 mileage and Service Reminder counters / limits contradicted the conventional wisdom at Matthew's Volvo site and all other Volvo forums that I had seen as late as 2013-04-30. This page intends to show you how to use an ELM327 to read the Vehicle Mileage from your instrument cluster (if your instrument cluster supports that capability).
It will be most helpful to '96-'97 850 owners with broken odometers (on VDO clusters). But the same approach can be used to read the Vehicle Mileage from a '97-'98 S70/V70/C70/XC70 (Yazaki) instrument cluster.
To help you test if you can read your Volvo's mileage with an ELM327-compatible tool, I've included: a list of the hardware and software requirements, some links pointing you in the right direction to get the ELM327 setup properly, and, most importantly, the ELM327-destined AT commands and KWPD3B0 (request-generating) commands that need to be sent to the ELM327 (in order to generate the car-destined KWPD3B0 requests), typical responses which have been generated on my 1997 Volvo 850 T5 and my 1998 Volvo S70 GLT (or on other 1996-1998 850, S70, V70, or XC70), and detailed explanations of those responses.
If you don't have time to read through this page in its entirety and you already have your ELM327 setup properly, check out one (or more) of these 3 possible shortcut solutions:
xiaotec "850 OBD-II" Android app, <<< Recommended 96-98 850 / S70 scanning app!
milageread.exe (on Windows), or milageread.py (whereever Python is installed), or
item 2a in this post within gmh's MVS thread: "I read my 97 850R mileage with ELM327 and an Android phone". That post's item 2a lists some ELM327 commands that can read the Vehicle Mileage from some '96-'97 Volvo 850 Instrument Clusters and some '97-'98 S70/V70/C70/XC70 Instrument Clusters.
The following were used to read the data shown on this page:
OBDII port (of 1997 Volvo 850 T5, 1998 Volvo S70 GLT, etc).
The OBDII port is sometimes referred to as the Diagnostic/Data Link Connector (DLC) or as the J1962 connector.
It's known that the method shown on this page has worked for at least one Volvo in each of the following categories:
It's not yet known if the method shown on this current page works for the following Volvos:
My guess is that the mileage reading probably works for most all USA and non-USA Volvo 850 that have an OBDII port (ie, a J1962 DLC connector) and were 1995-1997 models, if they have a VDO cluster. I'd also venture a guess that the mileage reading probably works for most USA and non-USA Volvo S70 / V70 / C70 / XC70 that have an OBDII port (ie, a J1962 DLC connector) and were 1996-1998 models (except for some non-USA 1998 S70 / V70 / C70 / XC70 that might use a newer protocol).
The OBDII emission diagnostics probably works for all the USA 1996-1998 850 / S70/V70/C70/XC70, but might only work for some of the USA 1995 850 that have an OBDII port. Furthermore, the non-USA 1995+ 850 / S70 / V70 / C70 / XC70 that have an OBDII port probably will not be able to perform much, if any, OBDII emission diagnostics [unless their ECM (Motronic 4.4, Motronic 4.3, etc) has been replaced or reflashed with USA-style OBDII emission diagnostic capabilities]. But even if those non-USA cars can not do any substantive OBDII emission diagnostics, they oftentimes will be able to read the mileage -- at least on 850 VDO clusters and S70/V70/XC70 Yazaki clusters.
~$18 ELM327 clone cable (v1.4 or higher).
My guess is that many ELM327 (v1.2 or higher) based devices will now work -- especially those that are based on the real (non-clone) ELM327 chip from Elm Electronics -- since (as of 2019-07-20) the commands on this page now use ATSR 13 as the preferred alternative to ATRA 13.
ScanTool.net OBDLink SX (USB), OBDLink LX (Bluetooth), OBDLink MX (Bluetooth), and OBDLink MX+ (Bluetooth for Windows/Android/iOS) devices -- with the latest firmware -- are also known to work quite well. As long as they have the latest firmware, (with respect to 850/SVC70 communication) they appear to operate like ELM327 v1.4 or higher, even though they respond to ATI as "ELM327 v1.3a".
I personally have successfully used the following 5 tools:
Each of those 5 tools have their own strengths. All of them are capable of performing the instructions on this page. [The first 4 are very capable. The BAFX is capable; it is adequate; but I don't recommend it due to my experience with more-than-I-care-to-deal-with Bluetooth communication errors.]
If your claimed ELM327-compatible device does *not* respond with an "OK" response to each of the following 5 commands, then it can *not* be used to read the vehicle mileage (and it probably can *not* be used for any KWPD3B0 communication):
Furthermore, if your claimed ELM327-compatible device responds to any of these commands with a question mark (?), then it may be a waste of your time to try using this site's info to communicate with your 1996-1998 Volvo 850/S70/V70/XC70:
So check with your device's vendor **before** purchasing a purported ELM327-compatible device to ensure that each command in those lists is handled like a real ELM327 (v1.2 or higher) compatible device would handle them.
See the Volvo 850 OBDII FAQ question "How to detect fake ELM327 devices that can not talk KWPD3B0?" for further help to avoid buying a device which can not read the '96-'98 Volvo 850/S70/V70/C70/XC70 mileage, and which can not perform other KWPD3B0 communication.
Hint for old ELM327 versions:
See ATTA,
ATSR (or ATRA),
and ATSI
below for some notes relating to ELM327 versions
>= v1.2 and < v1.4.
The answer to the
Volvo 850 OBDII FAQ
question "What version of the ELM327 is required to
communicate with 1996-1998 Volvo 850/S70/V70/C70/XC70 cars?"
may also help if you have an ELM327-compatible whose version
is >= v1.2 and < v1.4.
The bottom line is that
any true ELM327-compatible tool
from v1.2 (and higher) can probably be used to retrieve the
vehicle mileage using the commands shown on this page
(as of 2019-07-20) --
as long as a KWPD3B0 connection can be successfully
established with ECU 51 (COMBI).
Free, downloadable Silicon Labs CP210x VCP driver for use with ELM327 USB cable.
I've used CP210x_VCP_Win_XP_S2K3_Vista_7.exe (version v6.5.3) on WinXP, and I've used CP210x_VCP_Windows.zip (version v6.6.1) on both WinXP and Win7.
See Setup -- where "STEP 1" is mentioned -- for links to download the latest Silicon Labs CP210x VCP drivers for Windows, Linux, Mac, etc.
Note for USB and serial ELM327 tools:
Your ELM327 device might not use the Silicon Labs chip.
You may need driver(s) from other vendors.
For example,
the ScanTool.net OBDLink SX USB cable uses FTDI drivers,
and some ELM327 devices use Prolific drivers.
That
Setup page is intended to help
in locating the drivers for several common chips used by
vendors of ELM327-compatible diagnostic tools.
Note for Bluetooth ELM327 tools:
The Bluetooth ELM327 devices usually do not require extra
driver downloads, since the Bluetooth drivers are normally
built into the operating system's Bluetooth stack.
[For details, search Wikipedia for "Bluetooth stack"
and notice which stacks support the SPP profile.]
Free
OBD Now Terminal app (for Android).
Free
Bluetooth USB WIFI Terminal app (for Android).
Free ScanTool.net
STNterm terminal emulator
(for WinXP / Win7 / Win8.1 / Win10).
Free
Realterm v2.0.0.70 terminal emulator (for WinXP / Win7 / Win8 / Win8.1 / Win10) --
[or its several years older
Realterm v2.0.0.70 (unsigned) equivalent].
Free Hyperterminal terminal emulator (comes with WinXP) --
[what I used originally].
Free
PuTTY
terminal emulator (on Linux, Windows).
US$1.99
xiaotec "850 OBD-II" app (for Android) --
[built-in ELM327 terminal emulator
included with this low priced '96-'98 850/S70/V70/C70
scanning software].
Probably any good terminal emulator would work.
For your initial connects on Windows using USB, serial, or Bluetooth ELM327 devices, I recommend STNterm [search for "stnterm" on that page]. STNterm is simple and requires no setup other than selecting the port and baud rate. It is adequate for issuing single commands one at a time. It's definitely my first choice on Windows when testing a new ELM327 tool.
For your initial connects on Android using Bluetooth ELM327 devices, I recommend either of these 3 apps: "OBD Now Terminal", "Bluetooth USB WIFI Terminal", or "850 OBD-II". You pair your ELM327 Bluetooth device with Android, run one of those apps, connect, then issue single commands one at a time. On the "850 OBD-II" app (V1.1.0 or later), the ELM327 terminal emulator is reached via its "Service" button (see instructions).
If you plan on issuing more than just a few ELM327 AT commands, OBDII (request generating) commands, and KWPD3B0 (request generating) commands, or if you plan on issuing them often, and if you're running MS Windows, then downloading and installing Realterm is a good idea. If you install Realterm v2.0.0.70 -- (not Realterm v3.0.0.xx nor v3.0.1.xx) -- you'll also be able to eventually use volvo850diag (described here) which is expressly designed to communicate with the 1996-1998 Volvo 850 and S70/V70/C70/XC70 and minimize your need to remember any of the necessary commands.
If on Windows you don't like STNterm, Realterm, Hyperterminal, and PuTTY, then you might try TeraTerm on Vista / Win7 / Win8 / (and presumably Win10).
If those aren't a good fit for you, check out the four Elm Electronics, Hyperterminal equivalent on Win8, and Wikipedia links included here for terminal emulators on various platforms: MacOS8 thru MacOSX, Win95 thru Win8, WinCE, Palm, etc.
It has a pleasant GUI that scrolls easily to see previous commands and responses. And it comes preconfigured with a timestamped log file! "OBD Now Terminal" is most usable after issuing ATZ, then ATE0.
This also has a pleasant GUI that scrolls easily to see previous commands and responses. It can also create a log file. This app (by "Timers n Savers") works better than the previously recommended ElmBasic (which seems to no longer be available). "Bluetooth USB WIFI Terminal" is usable after clicking both "CR" and "LF", then issuing ATZ, ATL1, and ATE0.
But "Bluetooth USB WIFI Terminal" is most usable: a) after loading a command list (in their format) that begins with lines for ATZ, ATL1, ATE0, then includes 1 line for each of the commands you want to use; b) then clicking "Send Direct" and "LF", but leaving "CR" unchecked; c) then clicking any of the desired commands from the command list, scrolling to the next command, then repeating step c) until you're finished scanning. It's not scripting, but at least use of the command lists eliminates most typing.
Note:
Previously on this page, I had noted:
"Even though some of the OBDII diagnostics software programs
suggested by ELM327 vendors do provide the capability
to interactively send requests (like our KWPD3B0 requests)
after the connection with the car has been established,
there is no OBDII diagnostics software program that I'm
aware of that allows complete control of the ELM327 setup
before an ISO9141-2 style connect is established.
Consequently, this page requires the use of a
terminal emulator to issue precisely what ELM327 commands
and KWPD3B0 requests will work to retrieve the mileage."
That's not entirely true.
After experimenting with OBDwiz and TouchScan,
I've been able to adapt some of the volvo850diag scripts
to work with
(some older versions of)
OBDwiz / TouchScan and have been able to
read the mileage. OBDwiz was tested with a ScanTool.net
OBDLink SX. TouchScan Demo was tested with both the
OBDLink SX and an ELM327 v1.5 USB clone.
Some of the steps involved have been documented in the
\scripts\touchscan_obdwiz\readme*.txt file extracted from
volvo850diag.zip.
Just thought I should correct the above quote to say:
At least 2 existing OBDII diagnostics
software programs --
(some older versions of)
OBDwiz and its sister TouchScan --
*have* been used to read the raw mileage
data in the response to ECU 51 B903.
If you don't have the above items, you'll have to improvise.
The required setup to read the Volvo vehicle mileage basically involves the following general steps (not necessarily in the order listed):
Prepare by exploring the following resources:
Install any drivers needed by your ELM327 tool.
Make necessary configuration changes for your type of ELM327 device.
For USB and DB9 serial devices,
plug in the ELM327 to your phone / tablet / laptop / etc.
For Bluetooth devices, pair the Bluetooth device
with your computer.
For wireless devices, perform the wireless equivalent of
Bluetooth pairing.
Download and/or install an appropriate terminal emulator, if its not already provided on your smart phone / tablet / laptop / etc that's driving your ELM327 device.
Check for successful communication to the ELM327 device by using the terminal emulator to send the ELM327 command sequence -- ATZ, ATL1, ATE1, ATI, ATIIA 51 (where each of those 5 commands are entered on a separate line) -- while observing each of their responses.
Note:
For ELM327-compatible devices that connect via USB,
you can even perform this initial communication test
with the ELM327
(on the desktop) **before** doing
the next step (in the car).
Plug in the ELM327 device to your car's OBDII port, ensuring it is plugged in firmly.
Turn ignition to pos II.
If you have a car which was required to handle OBDII emission diagnostics (eg, the USA '96-'97 Volvo 850), then use a vendor suggested OBDII software program to perform some OBDII diagnostics. Sometimes those programs are very useful in helping debug initial communication problems, such as mismatched speed settings, etc. Some commonly used OBDII diagnostic programs are: OBDwiz, TouchScan, Torque, etc. If that software can connect, then display any OBDII DTCs, Coolant Temp, RPM, Speed, Fuel Trims, etc, then the ISO9141-2 connection has definitely succeeded.
Everything after this Requirements section assumes: a) that you already have the ELM327 operational enough to successfully perform an ISO9141-2 style Slow Init connection, and b) that you have a terminal emulator setup properly. If you already know your ELM327 can perform an ISO9141-2 connect with your Volvo 850 / S70 / V70 / C70 / XC70, and you already know a terminal emulator is setup properly, then you can skip to the next section to Read COMBI data.
Otherwise, using the above "required setup" bulleted list as a guide, the first order of business is to establish communication with the ELM327. A serial terminal emulator can be used to do that. Terminal emulators work both with the USA cars that have OBDII emission diagnostics and with the European cars that did not provide OBDII emission diagnostics during the 1995-1998 time frame.
Some terminal emulators that have been used to retrieve the vehicle mileage from a 1996-1998 Volvo 850, S70, V70, etc. COMBI include:
OBD Now Terminal (on Android),
Bluetooth USB WIFI Terminal (on Android),
PuTTY (on Linux, Windows),
STNterm terminal emulator (on WinXP / Win7 / Win8.1 / Win10),
Hyperterminal (on WinXP under All Programs / Accessories / Communication),
Realterm (on WinXP, Vista, Win7, Win8, Win8.1, Win10).
Also, you should be able to use some of those included in:
ELM Electronics more expansive list of terminal emulators for ELM ICs that includes terminal emulators for Mac, Win95/Win98/WinXP/Vista/Win7, WinCE, and Palm,
stackexchange.com's user suggested Hyperterminal equivalents in Win8, or
Wikipedia's List of terminal emulators.
Using a terminal emulator, issue the following five (5) ELM327 commands, each on a separate line: ATZ, ATL1, ATE1, ATI, ATIIA 51.
Once you:
then:
you've at least got your ELM327 talking with your smart phone / tablet / laptop / etc.
If the "ATIIA 51" command responded exactly the same as the "ATI" command, then you can not use the instructions on this page to retrieve the mileage, since your ELM327 device is incapable of communicating with the Volvo special KWPD3B0 protocol necessary to read the vehicle mileage and to further communicate with the COMBI, SRS, ABS, AW 50-42 (if available), Power Seats (if available), etc. This page will be of no use to you while using a KWPD3B0-incapable pseudo-ELM327 !!!
Hint:
Click here
for help in detecting and dealing with a "partial" ELM327 device
which does not respond to ATIIA 51 with an OK.
However, if the "ATIIA 51" command responded with "OK", then:
you've verified that the most important ELM327 command necessary to communicate with a Volvo 850 / S70 / V70 / C70 / XC70 using the KWPD3B0 protocol does indeed work. Most likely it'll be OK to continue further on this page and attempt to communicate with the COMBI. [To perform a more complete check, you can a) relatively quickly test the ELM327 commands listed in the Warning above, and/or b) spend some more time and review the answer to the FAQ question mentioned in that Warning, since that FAQ answer goes into much more detail.]
Once you get the ATZ, ATL1, ATE1, ATI, and ATIIA 51 working, if you have a Volvo which can not handle OBDII emission diagnostics (eg, a pre-2000 European Volvo with an ECM which does not handle OBDII emission diagnostics), then bypass the next few paragraphs and jump directly to the next section on Read COMBI data.
If you have not yet connected via any OBDII diagnostic software and you have a USA 1995-1999 850 / S70 / V70 / C70 / XC70, you can still check if the ISO9141-2 style Slow Init connection can be established. Just use the terminal emulator to issue these 4 commands to the ELM327: ATZ, ATL1, ATE1, 0100 -- each on a separate line. Check if the 0100 OBDII command and its response(s) appear similar to the following example when the headers/checksums display was disabled:
or similar to the following example for a vehicle that also had a Secondary Air system, and had headers/checksums display enabled.
If that is not the case -- ie, you can not initialize
successfully (eg, you get "BUS INIT...ERROR" or "UNABLE TO CONNECT"
responses), and/or
you can not get the 0100 command to generate responses
that are formatted somewhat similar to one of the above examples
(where responses to 0100 begin with 41 or 48), and
if you know your car has OBDII emission diagnostic
capability -- then you might need to:
a) reseat your ELM327 connector into the car's J1962 OBDII port,
b) repeat something in the above bulleted
"required setup" list,
c) turn on your ignition,
d) do some more web research, and/or
e) ask some questions in the
MVS 850, S70, V70... forum or some other Volvo forum.
Or you could always just continue to the next section and see what happens.
Note:
In the remainder of this page, the COMBI will sometimes be referred to
as ECU 51.
(A list of several of the other
1996-1998 Volvo 850 / S70 / V70 / C70 / XC70 ECUs'
hexadecimal #s is available
here).
A list follows of the commands to read the mileage (using B903). It is what you would use immediately after plugging in all the cables (or after your ELM327 seemed to lock up or otherwise seem to be unresponsive or behaving unexpectedly).
>ATZ
>ATL1
>ATE1
>ATSP 3            (might be necessary to establish ISO 9141-2 as default)
>ATH1
>ATAL
>ATKW0
>ATSR 13           <<< Remember to use this or "ATRA 13"! <<<
>ATIIA 51
>ATWM 82 51 13 A1
>ATSI              (optional)
>ATSH 83 51 13
>B903
Another, even shorter, way involves: stopping any existing communication via ATPC [the ECUs will stop communicating in a little over 5 seconds], performing a less involved init sequence, then reading the mileage. This shorter sequence (shown below) is oftentimes all that's necessary when the ATZ thru ATSI sequence above has already been used to successfully establish communication with one of the ECUs via the keyword D3 B0 protocol --as is done when reading each ECU's DTCs, etc. in succession -- and there have not been any intervening resets (via ATZ, ATD, ATWS, power failure, or disconnecting the ELM327 from the car's OBDII port) after the KWPD3B0-specific setup just shown above.
>ATPC
>ATIIA 51
>ATWM 82 51 13 A1
>ATSI              (optional)
>ATSH 83 51 13
>B903
A more extended list follows of the minimum to read the ECU 51 DTCs and all ECU 51 B9 data. Keep in mind the same as above applies to this list also -- ie, ATPC can replace the ATZ thru ATSR 13 commands if all 8 of those commands had been successfully issued previously and are still in effect.
>ATZ
>ATL1
>ATE1
>ATSP 3            (might be necessary to establish ISO 9141-2 as default)
>ATH1
>ATAL
>ATKW0
>ATSR 13           <<< Remember to use this or "ATRA 13"! <<<
>ATIIA 51
>ATWM 82 51 13 A1
>ATSI              (optional)
>ATSH 83 51 13
>AE01
>B901
>B903
>B904
>B905
>B906
>B907
>B908
>B909
>B90A
>B90B
>B90C
>B90D
>B90E
>B9F0
And here are some extra B9xx commands that have been seen strictly on S70/V70.
>B9F1              (observed on '97 V70 TDI, my '98 S70 GLT, and other SVC70)
>B902              (on my '98 S70 GLT, and some other SVC70)
>B90F              (on my '98 S70 GLT, and some other SVC70)
>B910              (on my '98 S70 GLT, and some other SVC70)
>B912              (on my '98 S70 GLT, and some other SVC70)
>B913              (on my '98 S70 GLT, and some other SVC70)
>B914              (on my '98 S70 GLT, and some other SVC70)
>B915              (on my '98 S70 GLT, and some other SVC70)
The following are two (2) examples of all the above commands and their responses:
Details of all the listed commands and their responses -- including the recently discovered S70/V70 specific B9xx commands/responses -- are now described (with extra ATI, ATDP, ATBD, ATKW, and ATPC commands thrown in for good measure).
Just click on each command's link to see that command's/response's detailed description.
This is an example of a '97 850 T5 having its COMBI DTCs and B9xx data being scanned with an ELM327 v1.5 clone USB cable.
>------ The first ATBD shows a good ISO9141-2 style slow initialization,
        where the ELM327 interprets the entire exchange as the
        following 6 byte message:

        * proper ECU:       51    (sent by ELM327 at 5 baud)
        * proper sync byte: 55    (sent by ECU 51 at 10400 baud)
        * proper keywords:  D3 B0 (   "       "        "       )
        * B0 complement:    4F    (sent by ELM327 at 10400 baud)
        * 51 complement:    AE    (sent by ECU 51 at 10400 baud)

        You only see this ATBD response **if** the ATBD is issued
        within < 3 seconds after the "...OK" is finished.

>------ The 2nd ATBD shows a "82 51 13 A1 87" keepalive request
        sent by ELM327 as tester 13 to ECU 51.  The first one
        is usually sent 3-4 seconds after the "...OK", then the
        keepalive request is resent by the ELM327 every 3-4 seconds
        thereafter.

>------ NOTE: For ScanTool.net OBDLink SX/LX/MX/MX+ devices,
        it's useless to use ATBD commands, since they always respond:
        00 00 00 00 00 00 00 00 00 00 00 00 00.
>------ ECU 51 B9 data recorded at: 2013-04-20 19:32.

 ------ B903 = 34 30, ie, 3034 hex = 12340, which implies mileage of
        12340 * 10 = 123400.  This is 123400 - 121820 = 1580 miles (2543 km)
        since the last reading on 2013-01-18.

 ------ Changes from last ECU 51 B9 readings on 2013-01-18 09:48 are:
            B903 -- (3034 - 2F96) hex = 9E hex = +158, implies 1580 miles (2543 km).
            B906 -- (3AE3 - 3971) hex = 172 hex = +370, implies 92 days 12 hours.
            B908 -- (0D75 - 0D19) hex = 5C hex = +92 engine hours.
        B903 matches well with actual values.
        B906 matches extremely well with actual values.
        B908 is plausible.
This is an example of a '98 S70 GLT having its COMBI DTCs and B9xx data being scanned with a ScanTool.net OBDLink LX BT (Bluetooth) device.
In this example the ATSI, double ATBD, and ATKW commands are not used -- for the simple reason that they are seldom needed after the initial attempts to connect the ELM327 device to the COMBI, and because the ATBD commands are useless with the ScanTool.net OBDLink devices (that are based on the STNxxxx chips). Also, in this example two (2) STxx commands -- STI and STDI -- are used which help to identify more clearly what kind of ELM327-compatible device this is.
Notice how the "BUS INIT: ...OK" occurs after the first command which causes the Slow Init -- ie, the AE01 -- not after the ATSI as in the 850 example above.
Also, notice there are two "7E B9 23" responses -- one for B909 and one for B9F0 -- which are simply temporary "Request in progress" informational messages that inform the ELM327 to continue waiting for the final response, instead of giving up and declaring NO DATA. They are entirely benign (and just a nuisance to deal with). It is common to see 1 or more of these "7E xx 23" messages during scanning of some S70/V70/C70/XC70 ECUs, but those messages are never (or almost never) seen on the 850.
This S70 example is a composite example. The B903-B909 data is from one of the very first readings when I bought the car -- before the Reset SRI (ie, turn off SERVICE light) and before the reprogramming of the SRI limits to values more to my liking. During the 3+ years that I owned my '98 S70 GLT, the B901 and B90A-B90E and B9F0-B9F1 data always remained constant. Also, the SVC70-specific B902 and B90F-B910 and B912-B915 data remained constant during the 2+ years that I was aware of those S70/V70/C70/XC70-specific items' existence.
We'll go down through each of the commands and responses in the just listed examples, paying particular attention to each of the B9xx data values (returned in the F9xx response), and explaining what I've been able to infer about them. In the process, we'll see:
the typical way to setup the ELM327 to communicate via the Volvo keyword D3 B0 protocol (KWPD3B0),
the COMBI's DTCs,
the mileage (which does not include any mileage "lost" when the ABS module was failing),
the Service Reminder counters and limits, and
possible interpretations of the remaining B9xx data.
The explanations for the commands/responses below are generalized to explain both 850 cases and (some of the) S70/V70/C70/XC70 cases.
The first 3 commands are ATZ, ATL1, and ATE1 to reinitialize the ELM327, to turn on linefeeds, and to turn on echo. The ATZ output that identifies the ELM327 version will get garbled until the ATL1 is issued. So don't be surprised.
Note:
I didn't display the ATZ output and ATL1 output above as it actually
appears on the Hyperterminal display. If you want to see that,
refer to the
Volvo 850 OBDII FAQ question:
How do I read emission diagnostics DTCs by manually issued commands to the ELM327?,
in its Steps 1-6.
Hint #1:
ATL1 and ATE1 work well for me with Hyperterminal or with
volvo850diag / Realterm v2.0.0.70.
However, some terminal emulators or
programs work better with ATL0 and/or ATE0.
For example, STNterm works better with ATE0.
Experiment to see what works best for your situation,
then adapt the ATL1 and ATE1 commands in the command list so that
your resultant display looks like the ELM327 AT commands,
KWPD3B0 commands, and their responses shown on this page.
The STI is the first of two (2) ST commands to help identify the ScanTool.net OBDLink devices more clearly. It identifies the chip type and its firmware version. In our case, the chip type = "STN1155" (which is what an OBDLink LX BT uses) and the firmware version = "v3.4.1".
The STDI is the second of two (2) ST commands to help identify the ScanTool.net OBDLink devices more clearly. It identifies the device model and its hardware revision level. In our case, the device model = "OBDLink LX BT" and the hardware revision level = "r1.2".
These ST commands (and all other ST commands) are only useful with ScanTool.net devices, eg, OBDLink SX USB, OBDLink LX BT, OBDLink MX BT, OBDLink MX+ BT (for Windows, Android, iOS), and OBDLink MX Wifi.
The ATI simply documents the ELM327 version if you couldn't see it properly from the ATZ command.
The ATSP 3 (or ATSP 3A or ATSP A3) command will establish ISO 9141-2 as the default protocol. If the 'A' is included before or after the '3', then the default protocol will be set to AUTO, ISO 9141-2, and the ELM327 will fallback to "AUTO" if the attempt to connect via "ISO 9141-2" fails. It is probably wise to issue ATSP 3 at least once when you first start using your ELM327 device. Afterwards, because the ELM327 is good at remembering what protocol connected successfully, it may only be necessary to issue the ATSP command after you have used the ELM327 to connect to a vehicle which uses a different protocol than "ISO 9141-2".
The ATDP command documents the current protocol. During a lot of my testing, the protocol was forced to be ISO 9141-2, so that there was no confusion whatsoever which protocol was being used. However, things seem to also work well if the protocol is set to AUTO, ISO 9141-2. The ATDP command is included here simply to remind you that -- if the value is not either "ISO 9141-2" or "AUTO, ISO 9141-2", then things might not work as described here, and you'll likely need to issue ATSP 3 (or ATSP 3A).
Some other values for ATDP work partially, if they include AUTO, but I don't recommend use of any of them for the '96-'98 850/S70/V70/C70/XC70, since they don't work anywhere near as well as the "ISO 9141-2" or "AUTO, ISO 9141-2" mentioned in the previous 2 paragraphs.
The ATH1 turns on headers/checksum display. I very strongly suggest displaying the headers when using non-emissions diagnostics communication between the ELM327 and the Volvo 850 / S70 / V70 / C70 / XC70. There's several important things that you can not see if you don't display the headers. Consequently, the documentation on this site will almost always include those headers and checksums (at least for the non-emissions diagnostics using the Volvo special KWPD3B0 protocol).
The ATAL command relaxes the testing for message lengths. Normal OBDII protocols restrict the number of bytes (that are encapsulated by the 3-byte header and the 1-byte checksum) to 7 in both directions [ie, max total message length = 11]. When ATAL is used, the ELM327 will allow 1 more of these bytes -- up to 8 -- when sending [ie, max total sending message length = 12] and an unlimited number of those (post-header, pre-checksum) bytes when receiving.
Use of ATAL is necessary for viewing a wide variety of responses sent back from the Volvo 850 / S70 / V70 / C70 / XC70 using the Volvo keyword D3 B0 protocol (KWPD3B0).
For the '96-'98 850/S70/V70/C70/XC70, I strongly suggest always using ATAL when doing KWPD3B0-based diagnostics, and recommend never using ATAL when doing standard OBDII emissions diagnostics.
The ATKW0 command disables the keyword checking when performing the ISO 9141-2 protocol initiation. This is necessary when using the Volvo keyword D3 B0 protocol for non-emissions diagnostics, since the ELM327 knows nothing about those Volvo special keywords: D3 B0. They are not part of any standard (that the ELM327 knows about).
The ATTA 13 command changes the tester address. A tester address of 13 has successfully been used with all the ECUs mentioned in the Volvo 850 and SVC70 keyword D3 B0 protocol ECU lists (except for ECU 18). Tester address 13 is the one used by Vol-FCR, and it's the same one used by both rkam and Brick-Diag.
On 2016-11-14, Adam Goldman enlightened me:
"I think the ATTA command to the ELM is not necessary.
Here is my rationale. For protocol 3, ATTA sets the default header and
wakeup messages, until overriden by ATSH and ATWM. It doesn't set the
default receive filter, because protocol 3 normally uses J1979 style
headers without a tester address. However, the ELM327 will switch to
accepting responses with a tester address if you use ATRA or ATSR to
specify the tester address; and the STN1130 will automatically do this
if it sees a tester address in the request headers you set with ATSH.
Since the settings made by ATTA end up being overridden anyway with ATSH
and ATWM, you can skip the ATTA and do only ATSH, ATWM and ATSR/ATRA.
This would probably be of most interest to those on ELM v1.2/1.3 where
ATPP to set the tester address would thus be unnecessary."
That seemed to make sense to me, so I eliminated ATTA 13 from my development version of volvo850diag, and have tested it extremely thoroughly with an ELM327 v1.5 USB cable, an OBDLink SX USB cable, an OBDLink LX Bluetooth tool, an OBDLink MX+ Bluetooth tool, and a BAFX Bluetooth tool. I encountered no problems whatsoever with elimination of ATTA 13.
My testing of skipping ATTA 13 and only doing ATSR (or ATRA), ATWM, and ATSH reveals his contention is true. So you can almost certainly ignore the ATPP 06 alternative (that this page previously suggested for several years) when ATTA 13 is not implemented in your ELM327.
In volvo850diag v0.9 -- to simplify instructions so they are applicable to all ELM327 compatible devices from ELM327 v1.2 onwards -- both the ATTA 13 command (and its cumbersome ATPP 06 alternative) were eliminated entirely, and ATSR 13 became the default way that volvo850diag sets the Receive Address.
Historical note:
I've also been able -- on my 850 -- to use the default F1 tester address
via ATTA F1 (in conjunction with ATWM 82 51 F1 A1 and ATSH 83 51 F1)
to perform the ECU 51 B9xx commands below. And I've been able
to use the F1 tester address to read ECU 58 (SRS) DTCs and
clear an ECU 58 (SRS) DTC.
However, I don't suggest doing that, since ATTA F1 does not work for
ECU 01 (ABS) and probably other of the ECUs.
So you might as well just standardize on the tester address of 13
that Vol-FCR, rkam, and Brick-Diag use.
That does work for all the KWPD3B0-conversant ECUs.
The ATSR 13 (or ATRA 13) command manually sets the receive address, thereby turning off the ELM327's AR (Automatically set the Receive address) mode. This is a very important, essential command which forces the ELM327 to only accept responses addressed to 13.
The ATSR 13 (or ATRA 13) command is only used by KWPD3B0 communication, eg, to the Volvo's COMBI, ABS, SRS, Automatic Transmission, Power Seats, Motronic 4.4, etc. It should definitely not be used for OBDII emission diagnostics. When the ATZ is issued preceding OBDII emission diagnostics, it will erase the effect of ATSR 13 (or ATRA 13) and revert the ELM327 back to AR mode, as if an ATAR command had been issued.
History:
I only discovered ATRA 13 in late 2013-10, a year after discovering
how to perform KWPD3B0 communication via the ELM327.
So there's examples here and there on the web that don't display
this in the command list. But rest assured,
KWPD3B0 communication works much better when using ATRA 13
(or ATSR 13) --
especially while scanning ABS (ECU 01) and AW 50-42 (ECU 6E)
with ELM327 clone devices.
Important Mandatory
Requirement for ELM327 v1.2 and
v1.2a owners:
If your ELM327 does not have the ATRA command because it is a
v1.2 or v1.2a, then you
**must**
use "ATSR 13" instead of "ATRA 13".
ATRA and ATSR are synonymous commands.
ATTA 13 and ATRA 13 have been replaced with the single
ATSR 13
command:
On 2019-07-20,
this page was changed to list ATSR 13 (instead of ATRA 13)
as the preferred command to set the Selective Receive Address,
since ATSR 13 applies to a larger set of ELM327 chips.
At the same time, the ATTA 13 command was eliminated
from the command lists.
The ATIIA 51 command sets the Slow Init address to 51 (to override the default of 33 which the ISO 9141-2 spec requires for the OBDII emission diagnostics).
Warning:
The proper response to an ATIIA 51 command is: OK.
If the ATIIA 51 command does not respond with OK
-- eg,
if the ATIIA 51 command responds the same as the ATI command --
then you have an old or fake ELM327 which can not
perform KWPD3B0 communication !!!
The ATWM 82 51 13 A1 command overrides the default settings for the Wakeup Message (aka "periodic idle", aka "Keepalive", aka "watchdog message"). The message sent will be "82 51 13 A1 cs", where "cs" is the automatically generated checksum.
These Wakeup (Keepalive) messages are by default sent every 3 seconds, but you can change that with the ATSW command. For example ATSW CC changes the interval to roughly 4 seconds.
The ATSI command will manually start a Slow Initialization.
Originally, I thought it might be safer to begin the ISO 9141-2 Slow Initialization manually, rather than having the initialization automatically triggered when the first data request is sent, since:
However, as the following note explains, it is possible to bypass this command successfully.
Note for ELM327 v1.2 or v1.3 owners
(and anyone wanting to bypass the ATSI):
If your ELM327 doesn't have the ATSI command because it is a v1.2 or
v1.3, then you ought to be able to simply delete the ATSI command,
the two optional ATBD commands, and the optional ATKW command from
the procedures and follow the remainder of the procedures as is.
That would effectively issue
the ATSH command for the initial post-initialization command
before initialization is performed. You'll just have to
experiment with having a sufficient delay both before and after
the first command which will cause the implicit Slow Init in order to
get the "non-ATSI" approach to work consistently.
That approach is used with the
"Read All DTCs", "Quick Scan All ECUs", "Full Scan All ECUs",
"My Extra Scans", and ECU xx "Read DTCs" buttons in
volvo850diag,
and it works very successfully.
I wouldn't worry about any possible "incongruities"
just mentioned.
In fact, bypassing the ATSI command is now my preferred approach. I just let the ELM327 perform the Slow Init when it thinks that it should. That's why the ATSI command was not included in the S70 example above.
Because ATSI and the following ATBD and ATKW commands sometimes can come in handy for debugging connection problems, they are still listed here for completeness, and that's why the 850 example above does include them.
The two ATBD commands and the ATKW command which follow the ATSI are all three optional.
The 1st ATBD command is issued immediately after seeing the "BUS INIT: ...OK" response from the ATSI command, so that it can capture the "51 55 D3 B0 4F AE" sequence. The main thing I look for is the ECU address, 51 in this case, and the D3 B0 keyword bytes. But this is actually a standard ISO 9141-2 initialization response, other than the keywords used aren't mentioned in any ISO literature.
The 2nd ATBD command is issued about 4-5 seconds later, after the first Wakeup Message (ie, Keepalive) has been sent. The ATBD buffer should then contain: a 1-byte length of the immediately following Wakeup Message and checksum, the Wakeup Message specified by the ATWM command, the automatically generated checksum, and several bytes of garbage.
Neither ATBD command should be issued if you're using a ScanTool.net OBDLink device, since those devices just respond with a meaningless string of 00s. For OBDLink devices, you have to use the ATKW command to verify the keywords are D3 B0.
The "------" comments were added by me then later edited to be more readable. That's the standard way that I document what I'm doing while using the ELM327. Of course, you do not need to enter the comments when you're duplicating the sequences.
Those "------" comments are a good introductory explanation of the ISO9141-2 init sequence.
The ATKW command clearly shows the keywords. It is optional and is useful when you want to check the keywords, yet: a) the ATBD command (after an ATSI) was issued too late and didn't show the D3 B0 keywords, or b) the ELM327 compatible device -- eg, OBDLink SX, OBDLink LX, OBDLink MX, OBDLink MX+, etc -- does not have a useful ATBD command.
The ATSH 83 51 13 command sets up the proper header for KWPD3B0 requests that will have 2 bytes sandwiched after the header and before the checksum. The way to interpret this header (and 99.99% of all request headers in the Volvo keyword D3 B0 protocol) is:
83 is equivalent to 3 bytes, so when using this "83 51 13" header, 2 bytes of data must always be specified by the user (when sending the KWPD3B0 command to the ELM327). The "ATSH 83 51 13" command must precede KWPD3B0 commands that consist of 4 hex digits -- eg, AE01, B903, B9F0.
The "ATSH 82 51 13" command must precede KWPD3B0 commands that consist of 2 hex digits, ie, those that involve 1 byte (between header and checksum).
The "ATSH 84 51 13" command must precede KWPD3B0 commands that consist of 6 hex digits -- eg, A50701 -- ie, those that involve 3 bytes (between header and checksum).
The "ATSH 87 51 13" command must precede KWPD3B0 commands that consist of 12 hex digits, ie, those that involve 6 bytes (between header and checksum).
You get the idea.
Once a header is manually setup via an ATSH command, it remains in effect until another ATSH is issued, or the ELM327 is reset (via ATZ, ATD, ATWS, or power down).
The AE01 command is the way to retrieve the ECU 51 DTCs using the ELM327.
The AE01 command actually generates a KWPD3B0 request represented by "83 51 13 AE 01 cs", where "cs" is the automatically generated checksum. As you can see the "83 51 13" is the header that we specified with the ATSH command, and the "AE 01" is the AE01 command that we just specified.
The "84 13 51 EE 01 05 DC" response to the AE01 command (in our 850 example above) is interpreted as follows:
The 850 example's response to AE01 means:
ECU 51 (COMBI) has 1 DTC: 05 -> CI-113 -- Low Fuel / Fuel Level signal interrupted.
However, if our response to the AE01 command had been "83 13 51 EE 01 D6" (as in our S70 example above), then we would have interpreted it as:
There's 0 DTCs after the EE 01 and before the checksum, so the S70 example's response to AE01 means:
ECU 51 (COMBI) has 0 DTCs!
The B9xx commands retrieve what's considered the COMBI data that encompasses the vehicle mileage, the counters and limits associated with illuminating the Service light (to remind about getting the oil changed), and miscellaneous other parameters.
Each ECU 51 B9xx command actually generates a KWPD3B0 request represented by "83 51 13 B9 xx cs", where "xx" = 01, 02, 03, 04, ..., 0D, 0E, 0F, 10, 12, 13, 14, 15, F0, or F1, and where "cs" is the automatically generated checksum. As you can see the "83 51 13" is the header that we specified with the ATSH command, and the "B9 xx" comes from the B9xx command sent to the ELM327.
Their F9xx positive ack responses all have similar patterns:
Each of the specific B9xx command descriptions below will only focus on their responses' 6th thru last-1 bytes.
To get a rough preview of my present understanding of the COMBI's B9 values, check out jonesrh's ECU 51 B9 Meaning of Values raw notes, and consider leaving the raw notes open while reading the rest of this page. Sometimes those notes contain more info than this page.
The B901 command retrieves the 1 byte: A4 (hex) = 164 (decimal) in my USA '97 850 T5:
>B901
84 13 51 F9 01 A4 86
and B4 (hex) = 180 (decimal) in my USA '98 S70 GLT:
>B901
84 13 51 F9 01 B4 96
These values have always remained the same in their respective cars. I don't know exactly what B901 is. At first I thought it might be the "Ländercode" (ie, Country Code) which is displayed on the Brick-Diag Kombi-Parameter screen. But -- as can be seen in the values listed below -- the B901 codes do not have a one-to-one correspondence with a particular country. So my original Country Code guess wasn't quite correct.
The values for ECU 51 B901 that have been detected by kwpd3b0_interpreter.html (as of 2019-06-08):
One person suggested that Market Code might more accurately describe what B901 is. Even if that's the case, the exact decoding of B901 still remains to be discovered.
Maybe its a collection of flags?!?! Witness the similarity of the bits in B4, A4, 24 and the similarity in A8, A4, A2 and the similarity in B4, B2.
In any case, it is apparent from the above data that each individual B901 code seems to be associated with either 850 models or SVC70 models, but not both model classes. Also, each B901 code seems to simultaneously identify a particular class of country/countries, eg, USA vs. UK vs. Europe vs. Europe/Canada vs. Pacific/Europe, etc. Finally, each B901 code seems to possibly also identify turbo vs. non-turbo. Consequently, the Volvo 850/SVC70 KWPD3B0 interpreter has been updated to reflect my inferences from the above data.
The B903 command retrieves 2 bytes which represent the vehicle mileage. The lower order byte consistently increments once every 10 miles (~16.1 km), *IF* your ABS is sending the speed signal correctly. The ABS can actually be faulty for other reasons, but if it consistently delivers a valid speed signal, then this B903 value will increment (very close to or exactly) once every 10 miles.
The OTP Volvo 850 Service Manuals DVD (OTP-TP-51956) document "Combined Instrument, VDO 850 1996-" (TP-3801032), says on p28 that the Total Mileage is incremented "every 16 km/10 miles". Also, that same DVD's document "Combined Instrument Yazaki S70/V70/C70 1998-" (TP-3802201) says the same thing on its p10. So both the 850 VDO cluster and the S70/V70/C70 Yazaki clusters increment the Total Mileage after the same "16 km/10 miles" interval.
Since 1 mile = 1.609344 km (not 1.6 km), it remains to be seen which of the figures -- 16 km or 10 miles (that the OTP TP-3801032 and TP-3802201 documents refer to) -- correctly states when B903 is incremented. It could be:
Or it might even be some sort of approximation of both of the values, eg:
Since this calculation is very hard to precisely measure beyond 1/50 or so, I've arbitrarily chosen the "ECU 51 B903 increments every 10.0 mi (16.09344 km)" paradigm -- the first one listed above -- and have converted (most all) the jonesrh Volvo 850 OBDII portal to use that paradigm.
You might think this doesn't matter much. After all, a 10.0 mi - 9.941939 mi discrepancy of almost 0.06 mi every 10 miles is hardly noticeable after 10 miles. But after 150000 miles, that amounts to a 900 mile discrepancy.
It remains to be seen if that paradigm is the absolutely, most accurate one (of the 3 listed). But that's the one I've settled on -- probably permanently.As you recall the 850 example's B903 command and its response were:
>B903
85 13 51 F9 03 34 30 49
The way to calculate the mileage from the 2 bytes in the 850 example's F903 response are as follows:
Get the two bytes after the "F9 03" and before the checksum. In our 850 example, that is "34 30". Remember those are hex values.
Swap those two bytes. In our 850 example, that becomes 3034 hex.
Convert the hex to decimal, then multiply by 10. In our case we have: 3034 hex = 12340 decimal, and 12340 * 10 = 123400. That represents 123400 miles.
Convert to kilometers by multiplying by 1.609344 km/mile. In our case we have: 123400 miles * 1.609344 km/mile = 198593 km.
So 123400 miles (198593 km) is the 850 example's Vehicle Mileage (minus any lost mileage).
If you have some reasonable idea of the mileage "lost" due to ABS failure, then you can add that to the above figure. For example, in my case, I've kept meticulous records of precisely how many gallons of gas have been added to my car since I bought it. I can also come up with what I think is an "accurate enough for my purposes" Average MPG, since I had periodically calculated that off and on when I went from near empty to near full tanks of gas. After multiplying the Average MPG and the # of gallons, I concluded 10100 was a good estimate of my lost miles. So in my particular 850's example, adding 123400 + 10100 = 133500 should be a good estimate of the vehicle mileage when planning for maintenance purposes, and for informing anyone that might buy the car eventually.
There is probably some way to estimate the lost mileage based on B90A. However, it's not yet fully understood how that works, so I'll not mention it any further in this B903 section.
Mileage Calculation Hint #1:
To save some time in doing the mileage calculation, I've included
a page which can do the calculation for you:
Volvo 850 V70 keyword D3 B0 protocol interpreter.
You can even paste the contents of an entire ELM327 diagnostic session
into the interpreter's
Paste Volvo 850/SVC70 communication here box
and see what the interpreter can glean from the session.
I think you'll find it useful.
But remember the complete response -- with headers and checksum --
must be included for (almost all) responses from
ECU 51 and the other ECUs, and the responses must be left-aligned
(almost always),
else the interpreter will not be able to parse those ECUs' responses.
Mileage Calculation Hint #2:
Alternatively, you might try using the Google Sheets
Volvo 850 Mileage Converter
(that I think was developed by the author of the
Reading Mileage from a 1997 Volvo 850R blog at potatofi.com).
You change the values in "Block 6" and "Block 7" to match
those bytes in the ECU 51 F903 response, then observe the miles and
km in the "Block 6" column on the purple colored lines 7 and 8.
Even though it is titled as "Volvo 850 Mileage Converter",
it works well as both a '96-'97 850 Mileage Converter and
a '97-'98 Volvo S70/V70/C70/XC70 Mileage Converter.
Thank you, potatofi.com.
The S70 example's B903 command and its response were:
>B903
85 13 51 F9 03 83 4D B5
I'll leave it to you to try its calculation using the 4-steps listed above for the 850 example.
So 198430 miles (319342 km) is the S70 example's Vehicle Mileage (minus any lost mileage).
The B904 command retrieves 2 bytes which represent the vehicle mileage at last Service Light Reset. Its units are 10 miles (~16.1 km), just like those for the response to B903.
As you recall the 850 example's B904 command and its response were:
>B904
85 13 51 F9 04 24 19 23
The way to calculate the mileage from the 2 bytes in the B904 request's F904 response is similar to the way it is done for the B903/F903 mileage:
Get the two bytes after the "F9 04" and before the checksum. In our 850 example, that is "24 19". Remember those are hex values.
Swap those two bytes. In our 850 example, that becomes 1924 hex.
Convert the hex to decimal, then multiply by 10. In our case we have: 1924 hex = 6436 decimal, and 6436 * 10 = 64360. That represents 64360 miles.
Convert to kilometers by multiplying by 1.609344 km/mile. In our case we have: 64360 miles * 1.609344 km/mile = 103577 km.
So 64360 miles (103577 km) is the 850 example's Vehicle Mileage (minus any lost mileage) when the last Service Light Reset was performed.
Jump to the next section on B905 to see how the COMBI uses the B904 Mileage at (last) Service Light Reset when evaluating if the Service light should be illuminated.
Note:
The remainder of this section just contains some specifics of my
'97 850 T5 which help show a Service Light Reset was performed
on ~2002-12-26, over 10 years in the past, and that help to show
that car probably still had the original cluster.
If you're not interested in that, then feel free to skip to the
B905 section below (or go elsewhere).
There likely were 0 lost miles at 64360, since an ABS would normally not fail by then, so I assume that 64360 miles is the actual mileage, plus or minus 10 miles.
My CarFax records an oil and filter change at 63921 miles. That is a discrepancy of 64360 - 63921 = 439 miles between the two mileage figures. It's equivalent to a 439 / 64360 = 0.68% difference.
I would speculate that the 63921 is what appeared on the mechanical odometer, and the "Service Facility", presumably a Volvo dealer, entered that mechanical odometer reading into whatever computer or bookkeeping system that eventually caused the oil and filter change to appear in the CarFax report. That's certainly what happened 3 years later when another unspecified type of servicing occurred and the mileage was recorded as 75776. And that's certainly what happened 6.25 years later when a tail light bulb was replaced at a Volvo dealer and the mileage was recorded as 75774. In those 2 cases the mileage recorded was essentially the same (75774) as what I saw on my mechanical odometer at 2013-04-20 19:32 -- the time these B903 thru B909 readings were made -- ~10.3 years after the 64360 oil and filter change on 2002-12-26.
I further speculate that the B904 mileage of 64360 and the mechanical odometer mileage of 63921 correspond to the exact same point in time, since the B906 value, as we see below in the B906 section, increments once every 6 hours (calendar time), and my B906 value can be interpreted as the exact number of 6-hour intervals between that 2002-12-26 oil and filter change service at 63921 miles and the 2013-04-20 19:32 scan of B906 -- 10.318 years in the past (!!!!!). It's highly likely that B904 and B906 were updated at the same time -- B904 being overwritten with the B903 value and B906 being zeroed.
So -- if B904's 64360 and mechanical odometer's 63921 correspond to the same time -- I wonder why there's a 2/3 of 1% discrepancy?
Maybe the mechanical odometer was underreporting for some reason. Maybe it already had a problem that was manifesting. After all, it did definitely fail within 75776 - 63921 = 11855 miles of the 63921 oil and filter change.
Someone on Matthew's Volvo Site said there's almost always a discrepancy (that can be as high as this one) between the miles reported by the dealer using the Volvo Scan Tool (VST) and the physical odometer reading.
Maybe some sort of initial factory testing of a vehicle causes the B903 value to get ahead of the mechanical odometer reading.
2016-02-13 brainstorm: The 2/3 of 1% discrepancy -- to be exact 0.68% -- referred to in this section's jonesrh B904 historical notes is surprisingly similar to the 10.0 mi vs. 9.941939 mi discrepancy (ie, 0.58% discrepancy) implied in the New understanding of B903 value note.
If we interpret our present example's 1924 hex using the "every 16.0 km (9.941939 mi)" paradigm, instead of the arbitrarily chosen "every 10.0 mi (16.09344 km)" paradigm, the following calculations arise:
Convert the 1924 hex to decimal, then multiply by 16. In our case we have: 1924 hex = 6436 decimal, and 6436 * 16 = 102976. That represents 102976 km.
Convert to miles by dividing by 1.609344 km/mile. In our case we have: 102976 km / (1.609344 km/mile) = 63986 miles.
That 63986 miles calculation -- resulting from an "increment ECU 51 B903 once every 16 km" approach -- yields only a 0.1% error compared to the odometer observed of 63921 miles. Very interesting! That seems to suggest I might need to switch to the "every 16.0 km (9.941939 mi)" paradigm instead, or at least incorporate it as an alternative interpretation.
Who knows? Maybe there's a knowledgeable Volvo guru out there who can inform us.
The B905 command retrieves 1 byte which is (as of 2015-12-28) thought to always equal:
The B905 value is thought to always be in km/500 (for all cars worldwide), regardless whether the instrument panel displays mileage as miles or km).
As you recall both the 850 and S70 examples' B905 command and response were:
>B905
84 13 51 F9 05 10 F6
The way to calculate the Service Reminder Interval in Kilometers from the 1 byte in the B905 request's F905 response is:
Get the one byte after the "F9 05" and before the checksum. In our examples, that is "10". Remember that's a hex value.
Convert the hex to decimal, then multiply by 500. In our case we have: 10 hex = 16 decimal, and 16 * 500 = 8000.
So 8000 is the Service Reminder Interval in Kilometers.
Taking that a step further, we can calculate the Service Reminder Interval in Miles:
Divide the result in step 2 by the exact value 1.609344.
In our case the result is: 8000 / 1.609344 = 4971.
So 4971 is the Service Reminder Interval in Miles.
[Alternatively, you could have multipled the result in step 2 by the "close enough" approximation 0.6213712. For example, 8000 km * 0.6213712 km/mile = 4971 miles.]
My 1997 Volvo 850 Owner's Manual says on p2:5 concerning the Service reminder indicator intervals:
"This light will come on at 10,000 mile (16,000 km) intervals*,
after 750 hours of driving or after 12 months, whichever occurs
first...
* Turbo-charged model intervals: 5,000 miles
(8,000 km), 500 hours of driving or after 12 months,
whichever occurs first."
The way the COMBI evaluates the Mileage since Last Service Light Reset and compares to its corresponding limit is thought to be: simply compare the Mileage since Last Service Reset virtual counter (ie, B903 - B904) vs. the Service Reminder Interval limit (B905), after applying appropriate multipliers -- a) regardless what the "lost mileage" value in B90A is, and b) regardless if the instrument cluster (and/or Trip Computer if any) displays mileage as miles or km, and c) using the observation that B905 is a multiple of 500 km...
(B903 - B904) * 10 miles >= B905 * (500 / 1.609344) miles
(B903 - B904) * 16.09344 km >= B905 * 500 km
B903 is thought to increment every 10.0 mile = 16.09344 km (precisely).
B905 = Multiple of 500 km when SRI Mileage Limit is triggered.
B90A, lost_km_manipulation, and lost_miles_manipulation are not part of the comparison. The SERVICE light apparently works independently of any "lost mileage" that might be recorded one way or another in B90A.
This approach uses one single SRI Mileage comparison formula for all '96-'98 850 / S70 / V70 / XC70 worldwide. Its Comparison #1 form is more useful if you measure in miles. Its Comparison #2 form is more useful if you measure in kilometers. Both forms are identical in predicting / detecting when the SERVICE light comes on.
For some details on the new info concerning B903, B905, and B90A, see items 03, 05, and 0A in jonesrh's ECU 51 B9 Meaning of Values raw notes.
Slight inaccuracy
in formula that predicts when SERVICE light will illuminate:
On 2018-09-08, when my '98 S70's B905 SRI Mileage limit was 5000 km,
the SERVICE light came on somewhere between ~4 miles and ~30 miles
**AFTER** when it was predicted to come on.
So there is a slight inaccuracy in the formula above that
predicts when the SERVICE light will come on.
The amount of the slight inaccuracy will probably predict SERVICE
light illumination ~16-32 km (~10-20 miles)
for every 5000 km (~3107 miles) **before** the SERVICE light
actually does illuminate (when engine turned on).
Then display the new Service Reminder Interval Mileage limit with:
Alternatively, to reprogram this Service Reminder Interval Mileage limit with a pushbutton GUI, either:
The B906 command retrieves 2 bytes which mean the exact # of 6 hour periods since last Service Light Reset.
As you recall the 850 example's B906 command and response were:
>B906
85 13 51 F9 06 E3 3A 05
The way to calculate the 1/4 Days since Service Light Reset from the 2 bytes in the B906 request's F906 response is:
Get the two bytes after the "F9 06" and before the checksum. In our 850 example, that is "E3 3A". Remember those are hex values.
Swap those two bytes. In our 850 example, that becomes 3AE3 hex.
Convert the hex to decimal. In our case we have: 3AE3 hex = 15075 decimal.
So there's been 15075 * 1/4 days = 3768.75 days since the last Service Light Reset.
The example's B9xx data was recorded 2013-04-20 19:32. The car's CarFax shows the last "Oil and filter changed" service on 2002-12-26. Assuming there are 365.25 days per year, 3768.75 days / 365.25 = 10.318 years. Roughly speaking that should be about 10 years + 4 months - ~1 week in the past. The 2002-12-26 date is within a day of that calculation. Amazing!
You could also do the backtracking by counting exactly how many days occurred in each month and year until you exhaust your 1/4 day counter. The results should be very close to the same.
The B907 command retrieves 2 bytes which equal the Service Reminder Interval in exact # of 6 hour periods.
If you divide this value by 4, you'll get the precise # of calendar days since Last Service Light Reset (accurate to within 1/4 day) at which time the Service light will illuminate again due to this calendar time interval having transpired.
Most software will display this interval in Months, where it is (inaccurately, but close enough) assumed that each month has 30 days.
The 850 and S70 examples' B907 command and response were:
>B907
85 13 51 F9 07 A0 05 8E
The way to calculate the Service Reminder Interval in 1/4 Days from the 2 bytes in the B907 request's F907 response is:
Get the two bytes after the "F9 07" and before the checksum. In our examples, that is "A0 05". Remember those are hex values.
Swap those two bytes. In our examples, that becomes 05A0 hex.
Convert the hex to decimal. In our case we have: 05A0 hex = 1440 decimal.
Since the 1440 can be factored into 12 * 30 * 4, and can plausibly be interpreted as:
and especially since all but 10 of the observed 850/S70/V70/XC70 have this B907 value set at 1440, and since 5 of those 10 exception cases equalled:
and 1 of the 10 exceptions equalled:
The other 4 of the 10 exception cases equalled:
At the present time, I speculate that the 187.5 days cases have been reprogrammed sometime after the factory -- maybe with Brick-Diag Full, maybe with the VST or a VST lookalike, or maybe with info from volvo850diag, this page, or elsewhere that I've published the info.
Back to our example... It is probably true that if the Service light were to illuminate due to our example's 12 month interval transpiring (ie, our B907 = 1440 case), it would actually do so 5-6 days early each year (since the 1440 6-hour periods equates to 360 days instead of the typical year's 365 days or the leap year's 366 days).
The way the COMBI evaluates the 1/4 Days since Last Service Light Reset counter vs. its corresponding limit is simply...
If B906 >= B907, then illuminate the Service light.
Note that once again, the design principle of conceptual integrity seems to have kicked in. Both B906 and B907 have to do with the number of 1/4 days, so they are grouped together.
Then display the new Service Reminder Interval 1/4 Days limit with:
Alternatively, to reprogram this Service Reminder Interval 1/4 Days limit with a pushbutton GUI, either:
The B908 command retrieves 2 bytes which equal Engine Hours since Service Light Reset.
I kept an accurate record of "engine on" minutes over a several week period and can attest that this B908 data reflects Engine Hours, plus or minus an hour or two, when measured over a period of several days to several weeks. Further testing just before and just after an SRI Reset reveals those hours are indeed Engine Hours since Service Light Reset. That's consistent with the fact that "Engine Hours since Service Light Reset" is one of the parameters which can trigger the Service light to be illuminated (according to the Volvo 850 Owner's Manual).
The 850 example's B908 command and response were:
>B908
85 13 51 F9 08 75 0D 6C
The way to calculate Engine Hours since Service Light Reset from the 2 bytes in the B908 request's F908 response is:
Get the two bytes after the "F9 08" and before the checksum. In our 850 example, that is "75 0D". Remember those are hex values.
Swap those two bytes. In our 850 example, that becomes 0D75 hex.
Convert the hex to decimal. In our case we have: 0D75 hex = 3445 decimal.
So there's been 3445 "engine on" hours since the last Service Light Reset.
The B909 command retrieves 2 bytes which equal the Service Reminder Interval in Engine Hours -- also known as the Service Reminder Interval Engine Hours limit.
On my car, this value had always equaled 500 (until I experimented with reprogramming it).
The 850 example's B909 command and response were:
>B909
85 13 51 F9 09 F4 01 E0
The way to calculate Service Reminder Interval in Engine Hours from the 2 bytes in the B909 request's F909 response is:
Get the two bytes after the "F9 09" and before the checksum. In our examples, that is "F4 01". Remember those are hex values.
Swap those two bytes. In our examples, that becomes 01F4 hex.
Convert the hex to decimal. In our case we have: 01F4 hex = 500 decimal.
So 500 hours is the Service Reminder Interval Engine Hours limit.
The Volvo 850 Owner's Manual says, per the Service reminder indicator intervals quote listed in the B905 section, that a Turbo's Service Reminder Interval is 500 hours of "driving". The Brick-Diag "Kombi-Service" screen snapshot says "Motorbetrieb (h)", ie, Engine Operation Hours, can be 1000, 750, or 500. So I'm guessing that the "driving" comment in the Volvo Owner's Manual really means Engine Hours. It probably just means the hours the engine is turned on, and therefore even includes the engine hours when you sit idling for very long periods of time.
The way the COMBI evaluates the Engine Hours since Service Light Reset counter vs. its corresponding limit is simply...
If B908 >= B909, then illuminate the Service light.
Note that once again, the design principle of conceptual integrity has kicked in. Both B908 and B909 deal with the same subject, Engine Hours, so they are grouped together.
Then display the new Service Reminder Interval Engine Hours limit with:
Alternatively, to reprogram this Service Reminder Interval Engine Hours limit with a pushbutton GUI, either:
The B90A command retrieves 2 bytes which are believed to be what Brick-Diag Free v0.0.6.6, the Volvo Scan Tool (VST), and the OTP Volvo 850 Service Manuals DVD calls "Manipulation".
The OTP Volvo 850 Service Manuals DVD (OTP-TP-51956) document "Combined Instrument, VDO 850 1996-" (TP-3801032), says on p28, p150, p151, and p153 -- all 4 pages merged together -- that the "Manipulation of speedometer" parameter indicates in hours how long the Vehicle Speed Signal (VSS) to the COMBI has been disabled while the car was being driven. Apparently, the "RPM > 1500 rpm, Engine Coolant > 50 C (122 F)" constraint (mentioned on p95 for the "CI-221 Vehicle Speed Signal Missing" DTC) must be satisfied before the Manipulation hours is incremented.
Also, that same OTP 850 DVD's document "Combined Instrument Yazaki S70/V70/C70 1998-" (TP-3802201) says similar things about "Manipulation" on p10, p77, p134, and p138.
So both the 850 VDO cluster and the S70/V70/C70 Yazaki clusters keep track of the hours of mileage "Manipulation" when the Vehicle Speed Sensor (VSS) was missing.
The Volvo '96-'97 850 VDO cluster's "Manipulation hours" and the Volvo '97-'98 S70/V70/C70/XC70 Yazaki cluster's "Manipulation hours" is further believed to indirectly approximate the "lost" mileage from when the ABS module was not supplying the Vehicle Speed Sensor (VSS) signal.
ECU 51 B90A is thought to be that "Manipulation hours" value (or some other reflection -- one way or another -- of "lost" mileage).
The 850 example's B90A command and response were:
>B90A
85 13 51 F9 0A 22 00 0E
The way to calculate a value from the 2 bytes in the B90A request's F90A response is:
Get the two bytes after the "F9 0A" and before the checksum. In our 850 example, that is "22 00". Remember those are hex values.
Swap those two bytes. In our 850 example, that becomes 0022 hex.
Convert the hex to decimal. In our case we have: 0022 hex = 34 decimal.
If your B90A value (returned in the F90A response) = 0, then you can skip the remainder of this B90A section, and jump directly to B90B.
But if your B90A value is >= 1, you might want to read further...
To be honest, the correct way to estimate lost mileage from B90A is not really understood! But this section does provide a brief explanation of two guesses (along with a link to explore some alternative ideas).
Approach #1 - B90A-derived hours * Avg MPH or Avg Km/h
Judging from forums that discuss Brick-Diag Free v0.0.6.6 details and, especially, judging from the OTP Volvo 850 Service Manuals DVD's "Combined Instrument..." documents, and knowing that the primary reason for a missing Vehicle Speed Sensor (VSS) is failing ABS solders, the 34 (in our 850 example above) presumably means 34 hours that the VSS from the ABS was not being supplied properly to the COMBI.
If so, then the only way I can think of to calculate "lost" mileage from that is to multiply the hours derived from B90A by an estimated Average MPH or Average KmPH that applied during the hours that VSS was missing.
In my Volvo 850 T5 case, this "B90A hours * Avg MPH" approach failed miserably to estimate the "lost" mileage. So I explored alternative approaches...
Approach #2 - B90A * 500 km
The idea that best explains my 850's estimated 10100 miles of "lost" mileage is to assume B90A, after converting to decimal, must be multiplied by 500 km (ie, the same units as B905). Surprisingly enough, this calculation agrees with my 10100 miles "lost" mileage estimate -- to within 5% !!! The formula might be stated:
For details to this "B90A * 500 km" approach, see item 0A in jonesrh's ECU 51 B9 Meaning of Values raw notes.
Admittedly, there is nothing in the OTP Volvo 850 DVD which would lend credibility to this approach, but it's the only thing that's worked reasonably well for me so far.
To test my hypotheses, I propose that other 1996-1998 Volvo 850 / S70 / V70 / C70 / XC70 owners, especially those with both non-functioning speedometers and the ABS light on, make B903, B904, B905, B908, and B90A measurements to verify:
if B903 does not increment at all, or increments much less than the actual driven miles (as checked via a GPS, highway mileage markers, Google Maps, Mapquest, etc), and
when B90A increments.
We shall see if the "B90A * 500 km" approach or the "B90A-derived hours * Avg MPH or Avg Km/h" approach or some other approach works better as feedback comes in from other '96-'98 850/S70/V70 owners with ECU 51 B90A > 0. We might even find that ECU 51 B90A has absolutely nothing to do with the "Manipulation in hours" parameter and "lost" mileage.
I've never seen ECU 51 B90A increment while the ABS module sends a valid speed signal. The only time I've seen the (1st byte of the) B90A data increment is while a faulty ABS was being used that did not supply a consistent speed signal. It incremented once during the 9-day period, from the time I started measuring B90A data until shortly before I replaced the ABS with another one which did supply a proper speed signal.
Idea for further exploration:
For some details on the early 2016 changes concerning B903, B905, and
B90A, see items 03, 05, and
0A in
jonesrh's ECU 51 B9 Meaning of Values raw notes.
The B90B command retrieves 1 byte which is speculated to be a binary flag, like On/Off or Yes/No.
The 850 and S70 examples' B90B command and response were:
>B90B
84 13 51 F9 0B FF EB
The way to calculate something meaningful from the 1 byte in the B90B request's F90B response is:
Get the one byte after the "F9 0B" and before the checksum. In our examples, that is "FF".
Convert the hex to decimal or something else. In our case we have: FF hex = either 255 decimal (if unsigned), or -1 (if signed), or Yes, On, Enabled (if it is a binary flag, with probably 00 hex equating to No, Off, Disabled).
I haven't yet been able to come to a certain conclusion about this B90B data. The two values which have been seen so far are:
At one time I thought B90B was a "Boost Pressure Gauge exists" flag, ie, what is probably the "Ladedruck-Anzeige" on the Brick-Diag Kombi-Parameter screen. My car does have a Turbo gauge in the dash, which is what the Volvo 850 Owner's Manual calls "Boost pressure gauge". It is located between the Fuel Gauge and the Coolant Temperature gauge, but positioned a little higher than those two gauges. The manual states that the Turbo gauge is only for certain turbo-charged models. So its plausible that a flag needs to be maintained by the COMBI computer to remember whether this gauge exists or not.
Since tzanis has a Canada '97 850 GLT which does have B90B = FF, yet his car does not have a Turbo Boost gauge, that blows my "B90B = Boost Pressure Gauge exists" hypothesis out of the water. Back to brainstorming another explanation for B90B.
Again, some other Volvo owners will need to report this info, either with FF or other values for B90B, and they'll need to also report whether they do or don't have the Turbo gauge as shown on the Volvo 850 Owner's Manual p2:2, have VDO vs. Yazaki clusters, and what are the min and max of the tachometer's red range, etc. That way we can develop a clearer understanding of what B90B (and/or some of the other ECU 51 B9xx data) really is.
Got any ideas? Or got any better explanations?
The B90C command retrieves 3 bytes which I think might represent 3 different temperatures.
On my 850, those 3 bytes have never changed. They are the same on the initial reading -- when the bad ABS module was sending flaky speed signals -- and now when the repaired ABS module has consistently sent good speed signals for over 2 years.
Nothing on the Brick-Diag Kombi-Parameter screen (or OTP Volvo 850 DVD) seems to suggest an explanation for these values.
The 850 example's B90C command and response were:
>B90C
86 13 51 F9 0C 4B 6E 78 20
Possible ways to calculate something meaningful from the 3 bytes in the B90C request's F90C response are:
Get the three bytes after the "F9 0B" and before the checksum. In our 850 example, that is "4B 6E 78".
Convert them each individually from hex to ASCII. That yields "Knx".
Convert them each individually from hex to decimal. That yields 75, 110, 120.
Swap the order of the three bytes. In our 850 example, that becomes 786E4B hex.
Convert that hex value to decimal. In our case we have: 786E4B hex = 7892555 decimal.
Convert each byte individually assuming they are 3 different temperatures.
I can't think of a possible meaning for either "Knx" or 7892555.
I think it is unlikely that the "75 110 120" sequence represents 75000, 110000, and 120000 miles or 75000, 110000, and 120000 km.
But the "75 110 120" sequence could potentially be explained as 3 temperatures which are used in the algorithm to control the Instrument Panel's Temp gauge. Two different ways of interpreting as temperature have now been evaluated:
6a. This site's original temperature interpretation, in which the temperatures were assumed to be converted in the exact same manner as the temperature in: the response to the OBDII emission diagnostic 0105 command, and the response to the KWPD3B0 command for ECU 51 A50401.
Hint:
For details on the ECU 51 A5xx01 data, issue everything
up through A50901 in the
elm327_volvo_850_svc70_scan_combi_and_all_dtcs.txt
section, then feed all the results to
Volvo 850 V70 keyword D3 B0 protocol interpreter.
The resultant "Gleanings" for the ECU 51 E5xx responses
will serve as their explanations.
This original temperature calculation for each byte involved:
In our 850 example, the three bytes yielded:
6b. The newer, much simpler, temperature interpretation -- courtesy of XantheFIN -- in which the temperatures are assumed to be in Celsius, requiring no conversion (other than to Fahrenheit).
This is a much more plausible (and important) temperature interpretation, since the values more closely align with the temperatures when the Temp needle "almost reaches horizontal", "begins to rise above horizontal", and "reaches (at, near, or in the) red zone".
This "near horizontal to red zone" temperature calculation for each byte involves:
In our 850 example, the three bytes yield:
It is known from OTP Volvo 850 DVD documents that a normal operating temp is 80 C to 105 C -- at least for the 850 Motronic 4.4.
The original "three temperatures" interpretation involved: 95 F (35 C), 158 F (70 C), and 176 F (80 C). Those temperatures correspond to my 850 Temp gauge's: bottom tick mark, 1/3 mark, and 1/2 (horizontal) mark of normal operating temperature. Actually, the 95 F is reached about 1-2 minutes before the gauge begins rising (from its very bottom, resting state).
The "near horizontal to red zone three temperatures" interpretation involves: 167 F (75 C), 230 F (110 C), and 248 F (120 C). The first of those temperatures corresponds to my 850 Temp Gauge's needle being slightly below horizontal -- about a 10-15 degree angle below horizontal. It is speculated that the 2nd and 3rd temps corresponds approximately to the temp at which the Temp needle begins rising above horizontal, and the temp at which the needle reaches the red zone, respectively. I have not tested that speculation about the 2nd and 3rd (supposed) temp values meaning.
That agrees with the idea that the normal operating temp begins at 80 C, and suggests the Temp Gauge needle goes horizontal at or very close to when the normal operating temp is reached.
That agrees only marginally with the 6b idea that 75 C is "almost horizontal". But it definitely agrees with the 6b idea that 110 C and 120 C are above the normal operating temp range (that terminates at 105 C), so they could conceivably be the points at which the needle rises above horizontal and reaches the red zone, respectively.
Previously I'd seen that when my car idles for long periods of time (while the car is idling at 70 F ambient temp conditions), the Temp gauge needle stays on horizontal while the coolant temp continues to rise to 217 F, then the fan kicks on for a short while, the temp falls to 199 F within a few seconds, then the cycle repeats from 93 C (199 F) to 103 C (217 F) and back, over and over.
That agrees with the idea that the normal operating temp goes up to 105 C.Here's another temperature fact. It is known from OTP Volvo 850 DVD documents that if the ECM reaches 110 C the Motronic 4.3 will set the "EFI-513 Temperature warning level 2" DTC. So maybe the 6E hex = 110 refers to a temp at which the COMBI will say "I'm too hot". I doubt that, since no such COMBI DTC is mentioned anywhere, but I suppose it's possible.
Yet another possibility for explaining B90C is what the Brick-Diag Kombi-Parameter screen calls "Drehzahl", ie, RPMs. Brick-Diag's author, daniel2345, suggests this is 5000 / 7000, but I can't see how to get values like that out of these 3 bytes.
My 1st choice is the "three temperatures" interpretation (updated on 2015-12-09) to use the higher numbers which might correspond to temperatures when the Temp needle "almost reaches horizontal", "begins to rise above horizontal", and "reaches red zone". I no longer have a 2nd choice. But I'm still not convinced this is the correct interpretation, since the OTP Volvo 850 DVD seems to have nothing that suggests temperature setpoints are a parameter which can be read.
By the way, it appears that B90C is consistently different between the 850 and TDI SVC70 vs. the non-TDI S70/V70/C70/XC70 (ie, the SVC70 which do *not* use MSA 15.7). On a total of 51 separate 850 (and 2 separate SVC70 w/ MSA 15.7) -- apparently from USA, Canada, UK, Netherlands, Norway, Sweden, Finland, Estonia, Poland, Denmark, Germany, France, Switzerland, Italy, Bulgaria, Turkey, Thailand, and Australia -- that have had their ECU 51 B90C data submitted to kwpd3b0_interpreter, the B90C command and response were always the same as the 850 example above. Whereas, on 19 different S70/V70/C70/XC70 [none of which are known to use MSA 15.7], the B90C command always produced the following (different from 850) response:
>B90C
86 13 51 F9 0C 52 73 7E 32
If interpreted as temperatures using the new (as of 2015-12-09) "three Celsius temperatures from near horizontal to red zone" interpretation, that '98 S70/V70/C70/XC70 response to B90C corresponds to: 180 F (82 C), 239 F (115 C), and 259 F (126 C). All of those temps are higher than any B90C values (interpreted as temps) that have been seen on any 850 data submitted to kwpd3b0_interpreter.html.
Two pieces of info which seem to (at least mildly) support the idea that the 2nd ECU 51 B90C value might be the temp at which the needle begins rising above horizontal:
If B90C is not temperatures, what is it? Got any ideas? Or got any better explanations?
The B90D command retrieves 1 byte. On my '98 S70 GLT, this has been discovered to apparently be a Fuel Level Adjustment which affects:
For those with a 6-function Trip Computer on an S70/V70/C70/XC70, this is suspected to also affect:
This ECU 51 B90D value is usually 00 (for 850 and some SVC70) or 05 (for the majority of SVC70). For all 850 cars (seen by kwpd3b0_interpreter.html), it has always been 00. But a 05 has been seen in some 70-series cars: 1 '97 V70 T5, 1 '97 V70 TDI, 1 '98 S70 GLT, 3 different '98 V70, 1 SVC70 TDI, 1 SVC70 (probably turbo), 1 Poland C70, and 8 other 70-series cars. But the 1 known-to-be '98 XC70 that's been observed, had 00 for B90D. Also, 1 other '98 V70, 1 USA '98 C70 HPT, and 3 other (probable) S/V/C70 had 00 for B90D. So it's clear the 05 is not always used by the '97-'98 SVC70.
The S70 example's B90D command and response were:
>B90D
84 13 51 F9 0D 05 F3
The way to calculate something meaningful from the 1 byte in the B90D request's F90D response is:
Get the one byte after the "F9 0D" and before the checksum. In our S70 example, that is "05".
Convert the hex to decimal. In our S70 example, we have: 05 hex = 5 decimal.
Judging from the info in the OTP Volvo 850 DVD's document on the
1998 Yazaki S70/V70/C70/XC70 COMBI, this is (purportedly)
always one of the following for the S70/V70/C70/XC70:
-5, -4, -3, -2, -1, 0, +1, +2, +3, +4, +5
But Brick-Diag Free v0.0.6.6 only shows the following values in
its pulldown menu for: instruments Yazaka / MY98 / fuel gauge:
-5, -4, -3, -2, -1, 0, +1
The OTP Volvo 850 DVD document mentions that the Fuel Level Adjustment
can be -5 liters to +5 liters in increments of 1 liter,
or can be from -2 US gallons to +2 US gallons in increments of
0.5 gallon.
But in my experimentation with reprogramming the Fuel Level Adjustment,
I discovered that all values of B90D from 00 to 7D can be used.
With a tank half-full at 9 gallons, and starting with a B90D value
of 00 [already changed from its original value of 05],
then incrementally reprogramming B90D to an
ever higher value until finally reaching the max of 7D,
the Fuel Level needle is observed to do the opposite --
go lower and lower and lower (albeit very, very slowly
[it can take several minutes for the needle to finish its change]),
until finally ceasing the adjustment at around 2 gallons.
Then reprogramming B90D once more from 7D to 00 will cause the needle
to suddenly jump back to its pre-test position around 9 gallons.
Voila!
There's a much wider range of Fuel Level Adjustment than the
OTP Volvo 850 DVD document describes -- ~7 US gal -- and none
of those adjustments were done with a negative value
(like the ones shown in the OTP Volvo 850 DVD document or
like the ones shown in the Brick-Diag Free v0.0.6.6 "fuel gauge"
pulldown menu).
SVC70 ECU 51 B90D = 5 -- ie, the most commonly observed value for
the SVC70 -- is suspected to mean "no adjustment", ie,
0.0 US gal = 0.0 L = the "0" in the Brick-Diag Free v0.0.6.6
"fuel gauge" list.
SVC70 ECU 51 B90D = 0 -- ie, the only other value seen so far in SVC70
(other than during my own experimentation, or during other SVC70
owner's obvious experimentation) --
is suspected to correspond to the
Brick-Diag Free v0.0.6.6 "fuel gauge" list "+1" value.
Using my observation that raw hex 7D (ie, 125) equates
to a range of 7 US gal, and using raw hex 05 as the "zero point",
the following simplified table for SVC70 ECU 51 B90D can be
derived:
00  = +0.280 US gal ~= +1 L = possibly Brick-Diag Free's +1
05  =  0.000 US gal  =  0 L = possibly Brick-Diag Free's  0
0A  = -0.280 US gal ~= -1 L = possibly Brick-Diag Free's -1
0E ~= -0.5   US gal ~= -2 L = possibly Brick-Diag Free's -2
13  = -0.784 US gal ~= -3 L = possibly Brick-Diag Free's -3
17 ~= -1.0   US gal
18  = -1.064 US gal ~= -4 L = possibly Brick-Diag Free's -4
1D  = -1.344 US gal ~= -5 L = possibly Brick-Diag Free's -5
20 ~= -1.5   US gal
29 ~= -2.0   US gal
7D  = -6.720 US gal  = -25.438 L
The 850 example's B90D command and response were:
>B90D
84 13 51 F9 0D 00 EE
The way to calculate something meaningful from the 1 byte in the B90D request's F90D response is:
Get the one byte after the "F9 0D" and before the checksum. In our 850 example, that is "00".
Convert the hex to decimal. In our 850 example, we have: 00 hex = 0 decimal.
This is suspected to always be 0 for the 850, ie, that Fuel Level Adjustment is not possible on the 850 VDO COMBI.
For more details on interpreting SVC70 (and 850) ECU 51 B90D as Fuel Level Adjustment, see item 0D in jonesrh's ECU_51_B9_Meaning_of_Values_raw_notes.rtf. That item 0D also provides a clue on how to reprogram the S70/V70/C70/XC70 ECU 51 B90D Fuel Level Adjustment (and it shows a more detailed table than the simplified table shown above).
Maybe someone can chime in now about how much my interpretation of the Fuel Level Adjustment differs from the VST's "official" interpretation.
But regardless how much my interpretation might be off quantitatively, we at least know now how to reprogram the SVC70 Fuel Level Adjustment somehow, if the need arises.
The B90E command retrieves 1 byte which seems be an encoding of Tire Size.
The 850 example's B90E command and response were:
>B90E
84 13 51 F9 0E C3 B2
The way to calculate the Tire Size encoding from the 1 byte in the B90E request's F90E response is:
Get the 1 byte after the "F9 0E" and before the checksum. In our 850 example, that is "C3".
Convert the hex to decimal. In our case we have: C3 hex = 195 decimal.
Since "Reifen", ie, tire (size), is listed on the Brick-Diag Kombi-Parameter screen, and since 185, 195, and 205 were three tire widths mentioned in the Wheels and tires section on p5:2 and p5:3 of the Volvo 850 Owner's Manual, you might think that it's safe to conclude that B90E is the Tire Width (in mm).
However, there's two things which conflict with that "B90E = Tire Width (in mm)" idea:
All 3 tire values: Section Width, Aspect Ratio, and Wheel Diameter -- ie, the 195, 60, 15 of 195/60R15, the 205, 55, 16 of 205/55R16, etc -- have to be used to determine the distance traveled per tire revolution, not just one of those 3 values.
Several Volvo owners have submitted values to kwpd3b0_interpreter.html which don't look anything like a tire width in mm.
Here's a list of the B90E values that kwpd3b0_interpreter.html has seen (as of 2019-06-08):
hex C3 = 195 -> 195 mm =
A factory installed tire (section) width
mentioned in the 1997 850 Owner's Manual.
That's the only one that's almost certainly
a Tire Width.
It has been seen in my USA 850 and
in 1 Finland 850.
hex 0F = 15 -> 15 in =
A wheel diameter (presumably).
Has been seen in 1 USA 1998 S70 GLT,
2 USA 1998 V70,
1 USA S70/V70/XC70 (probably),
1 Canada S70/V70/XC70 (probably),
2 Netherlands SVC70,
1 France S70/V70/XC70 (probably),
1 German S70/V70/C70/XC70 w/ MSA 15.7,
1 Sweden (original Italy) '97 V70 T5,
1 Sweden SVC70 (probably non-turbo), and
1 Finland SVC70.
hex 27 = 39 =
Has been seen in 1 USA 1998 XC70 and
in 1 USA 1998 V70.
Approximately halfway between
38.1 cm (15 in) and 40.64 cm (16 in).
Is this a cm estimate of wheel diameter?
hex 22 = 34 =
Has been seen in
1 USA '98 C70 HPT,
2 USA '98 SVC70,
1 USA SVC70 (probably turbo),
1 Canada S70/V70/XC70 (probably), and
1 France SVC70.
Not sure what this value of 34 means.
Maybe it is 2 * 17 inches.
hex 1E = 30 =
Has been seen in what is believed
to be 22 different European 1996-1997 850
(1 from UK, 1 w/ MSA 15.7 from France,
4 others from France, 3 from Netherlands,
1 from Denmark, 2 from Germany,
1 w/ Fenix 5.2 from Switzerland,
1 from Czechia, 1 from Poland,
1 from Norway, 2 from Sweden,
1 '97 850 B5252s (2.4l 10V) w/ Fenix 5.2 from Finland,
1 other 850 from Finland, 1 from Estonia,
and 1 w/ MSA 15.7 from Bulgaria),
as well as 1 from Thailand, 5 from Australia,
and 1 from New Zealand.
Has also been seen in 1 USA 1997 850R wagon,
3 USA 850 w/ Motronic 4.4,
another 9 USA 850, 1 Canada '97 850 GLT,
2 other Canada 850, and in
1 850 (probably from USA, but possibly from
Japan).
In all 46 of those B90E = 1E cases,
each car's B90B thru B90E
have the same respective values:
B90B = FF, B90C = 4B 6E 78, B90D = 00,
B90E = 1E.
Unknown what this decimal 30 might be referring
to?!?! Maybe it's some sort of index
in a table listing different tire sizes.
In any case, it is the most often observed
value for ECU 51 B90E.
[There has been 1 additional car with
B90E = hex 1E -- ie, a Poland C70.
This is mentioned separately, since it is
the first such SVC70 observed with
ECU 51 B90E = hex 0F, and this situation
is considered to be an anomaly, possibly
due to owner reprogramming of ECU 51 B90E
via the "850 OBD-II" Android app.]
hex ?? = N.A. (Not Applicable, or Not Available)
This case describes the 6 cars that
responded to the ECU 51 B90E request with
"7F B9 12", which suggests the COMBI
might have an earlier form of its firmware
that had not yet implemented Tire Size
programming.
It remains to be seen exactly how to interpret this parameter, though my B90E tests in 2014-08 indicate that it *is* very likely some sort of encoding of the Tire Size.
I'm open to suggestions on its interpretation, especially the hex 27 and hex 1E mentioned above. And I'm curious what other '96-'98 850/S70/V70/C70/XC70 owners show for their ECU 51 B90E value.
Any variance of the COMBI's Tire Size parameter vs. the actual tire size might explain any differences in mileage between what the Instrument Panel reports -- either via the mechanical odometer or B903 and B904 mileages -- vs. the actual mileage that is transversed and is measured by mile markers along the highway.
Since I am unable to obtain Brick-Diag Full, I've experimented with changing ECU 51 B90E to see how it affects the counting of miles. In 2014-08 I changed my B90E value from 0xC3 = 195 to 0xCD = 205 just like the following Hint explains.
Then display the new B90E (encoded Tire Size) parameter with:
I did this partially to experiment with B90E, and partially because my car has always had 205/55-R16 tires on it (at least while I've owned it), and I figured 205 would better match the 205/55-R16 tires and give a more accurate reading of the mileage. But such was not the case! It turns out that the value of ECU 51 B90E = 0xCD = 205 read 0.1 miles extra per 8.25 miles. In other words, it counted 1.2121% too high, compared to the actual miles traversed by my car. The comparison was made between the Trip Computer's Odometer vs. the freeway mile markers.
So I then changed ECU B90E back to its original value of 0xC3 = 195, which it had been previously for (at least) as long as I've owned the car. The commands used are shown in the following Hint. Of course, I was already connected to ECU 51 when issuing those commands.
Then display the new B90E (encoded Tire Size) parameter with:
I then went for a drive and duplicated the previous freeway mile markers test. Surprise! Even though I have 205/55-R16 tires on the car, a value of ECU 51 B90E = 0xC3 = 195 causes the Trip Computer Odometer to track the freeway mile markers near perfectly -- off by about 0.02 mile per 25 miles, ie, better than 99.9% accuracy. I was amazed! That's way better than I expected!
I can't explain: a) why ECU 51 B90E = 205 doesn't read 2.748% more miles like my Tire Size comparison between 195/60 R15, 205/55 R16, etc. analysis suggests it would, instead of the 1.2121% more that I observed. Nor can I explain: b) why a value of 195 would match up very well with my 205/55-R16 tires. It confounds me.
But even though I can't explain those 2 things, I do have enough sense to leave my car's COMBI B90E value at 0xC3 = 195.
But if your Trip Computer Odometer does not track the freeway mile markers (or GPS, or other accurate mileage marker) -- eg, after you change your wheel/tire size -- then you might consider reprogramming ECU 51 B90E to one of the values that have been seen on other cars:
or you might try the value that I experimented with:
"Combined Instrument, VDO 850 1996-" (TP-3801032), p28 and p154.
"Combined Instrument Yazaki S70/V70/C70 1998-" (TP-3802201), p11 and p139. In this document you can search for "tire size" to find those pages. The second page seems to suggest that all '97-'98 S70/V70/C70/XC70 Yazaki "Tire Size" values map into either "STANDARD - 195/60 R15 - Small circumference" or "205/55 R16 - Large Circumference".
The B9F0 command retrieves 15 bytes which contain the Hardware and Software versions and revisions of the ECU. What I am calling the Hardware version and Software version appears to me to be a Volvo part number, ie, a 7-digit number beginning with 9. Vol-FCR calls them "Module Id" and "Software Code", respectively.
The 850 example's ECU 51 (COMBI) B9F0 command and response were:
>B9F0
92 13 51 F9 F0 00 09 44 23 78 30 30 32 09 44 22 07 30 30 31 60
The way to parse the 15 bytes of data in the B9F0 request's F9F0 response is:
Get the 15 bytes after the "F9 F0" and before the checksum.
In our 850 example, that is:
00 09 44 23 78 30 30 32 09 44 22 07 30 30 31
I don't know what the first 00 byte is, unless it is part of the next field.
The subsequent "09 44 23 78" is strung together as "09442378" and is probably a Volvo part number for the ECU hardware. Normally this number is stamped on the outside of the ECU's container.
The subsequent "30 30 32" is a 3-character ASCII string. In our case, it equals "002". This is the hardware revision #.
The subsequent "09 44 22 07" is strung together as "09442207" and is probably a Volvo part number for the ECU's software. I believe this number is also stamped on the outside of the ECU's container.
The subsequent "30 30 31" is a 3-character ASCII string. In our case, it equals "001". This is the software revision #.
All KWPD3B0-conversant ECUs seem to use this B9F0 request / F9F0 response mechanism, and they use the same format for the part # and the revision #.
If you scan for all ECUs on a Volvo and find one that connects via ISO9141-2, identifies itself with keywords D3 B0, responds to B9F0, but has an ECU # whose purpose is not yet known, then you can usually do a web search for the Hardware # derived from the F9F0 response and discover the ECU's function.The B9F1 command retrieves 7 bytes which contain a Date and Time of the ECU.
The S70 example's ECU 51 (COMBI) B9F1 command and response were:
>B9F1
8A 13 51 F9 F1 19 96 06 03 08 00 00 98
This likely means: 1996-06-03 08:00:00, ie, year-month-day hour:minute:second.
The SVC70 COMBI seem to have the B9F1 command, but the 850 COMBI seem to not have it.
The B902 command retrieves 1 byte whose meaning is unknown.
The S70 example's ECU 51 (COMBI) B902 command and response were:
>B902
84 13 51 F9 02 01 E4
So B902 = 01 hex in this case. Its meaning remains to be discovered.
The B90F command retrieves 1 byte whose meaning is unknown.
The S70 example's ECU 51 (COMBI) B90F command and response were:
>B90F
84 13 51 F9 0F 00 F0
So B90F = 00 hex in this case. Its meaning remains to be discovered.
The B910 command retrieves 1 byte whose meaning is unknown.
The S70 example's ECU 51 (COMBI) B910 command and response were:
>B910
84 13 51 F9 10 80 71
So B910 = 80 hex in this case. Its meaning remains to be discovered.
The B912 command retrieves 1 byte whose meaning is unknown.
The S70 example's ECU 51 (COMBI) B912 command and response were:
>B912
84 13 51 F9 12 32 25
So B912 = 32 hex in this case. Its meaning remains to be discovered.
The B913 command retrieves 1 byte whose meaning is unknown.
The S70 example's ECU 51 (COMBI) B913 command and response were:
>B913
84 13 51 F9 13 32 26
So B913 = 32 hex in this case. Its meaning remains to be discovered.
The B914 command retrieves 2 bytes whose meaning is unknown.
The S70 example's ECU 51 (COMBI) B914 command and response were:
>B914
85 13 51 F9 14 0A 0F 0F
So B914 could equal:
Its meaning remains to be discovered.
The B915 command retrieves 1 byte whose meaning is unknown.
The S70 example's ECU 51 (COMBI) B915 command and response were:
>B915
84 13 51 F9 15 00 F6
So B915 = 00 hex in this case. Its meaning remains to be discovered.
The ATPC performs a Protocol Close to cease any existing communication channels between the ELM327 and the Volvo. This is the easiest way to stop the ELM327 from sending any more automatic A1 (Keepalive) messages.
Issuing the ATPC (almost) negates the need to send an A0 (Stop Communication) message (like Vol-FCR and Brick-Diag Free v0.0.6.6 do). The A0 is superior in that it will immediately cause the ECU to terminate the connection. Whereas the ATPC will simply cause the ELM327 to stop sending the Keepalive messages, so it may take as much as 5+ seconds for the comm link to actually be severed by the ECU, depending on when the last Keepalive had been sent by the ELM327.
The ELM327 parameters seem to retain their values after an ATPC, so that any immediately subsequent init (of either this same ECU or any of the other ECUs that communicate via KWPD3B0) only have to use the proper ECU-specific ATIIA and ATWM commands before either:
issuing an ATSI command to explicitly perform the ISO9141-2 Slow Init, then following that with the appropriate ECU-specific, next-KWPD3B0-request-specific ATSH command before issuing other KWPD3B0 (request generating) commands; or
issuing the proper ATSH command and a KWPD3B0 (request generating) command (eg, AE01 or B903 or B9F0) to implicitly trigger the ISO9141-2 Slow Init, before issuing other KWPD3B0 (request generating) commands.
Here's some useful external references:
ELM327 data sheet (for one of the latest versions of the ELM327). It's both a user manual and a development guide.
ELM327 v2.3 data sheet (for the chip that became available in 2020-05).
ELM327 v1.4b data sheet. This is the data sheet on Elm Electronics' data sheet page which (probably) most closely matches a typical ELM327 v1.5 clone.
ELM327L v2.3 Now Available.
ELM Electronics' OBD chip products overview page.
One of these pages will likely mention the latest ELM327 chip
(ELM327 v2.3 or newer).
Deleted link to ECUPROJECT.COM Tuning Forums > Volvo > General Topics > "Diagnose and communication" first post by rkam on 2009-05-19 -- my Rosetta stone for understanding the KWPD3B0 protocol -- since it seems to have vanished from the net. For more details, see this explanatory note.
Brick-Diag screen snapshots overview.
Brick-Diag Kombi-Service screen.
Brick-Diag Kombi-Parameter screen.
For help translating those pages, click
Brick-Diag Kombi screen translated terms.
Here's two useful internal references with some info that's not documented elsewhere on this portal:
Volvo 850 OBDII FAQ.
Got a question? Maybe its answered here.
It's worth a quick perusal.
ELM327 Commands to Scan Volvo 850 and SVC70.
This contains elm327_volvo_850_svc70_scan_all.txt,
a very extensive list of the ELM327 commands to do a thorough
scan of the Volvo 850 / S70 / V70 / C70 / XC70 --
much more thorough than the COMBI oriented list on this page.
It's certainly thorough enough for most DIYers purposes.
The commands are listed in the typical order
that I would type (or send) them. This is also well worth a
quick perusal, or maybe even a very long study!
Once you've generated an ELM327 log from all or portions of this command list along with the Volvo's responses (either 850 or S70/V70/C70/XC70), you can paste the contents of that log into the Volvo 850 V70 keyword D3 B0 protocol interpreter page's Paste Volvo 850/SVC70 communication here box, then press the Interpret button, to gain some understanding of what the log recorded.
Here's a tool to help you semi-automatically scan the Volvo 850:
volvo850diag.zip,
ie, volvo850diag to be run on your "local" machine.
The "local" version of volvo850diag
uses an ELM327, Realterm (v2.0.0.70 only),
Internet Explorer (IE8 on WinXP, IE11 on Win7/Win8.1/Win10),
and Javascript to communicate with a
'96-'98 Volvo 850/S70/V70/C70/XC70. The contents of
its automatically generated log can be pasted into the
KWPD3B0 interpreter's Paste box, followed by pressing
the Interpret button,
to make some sense out of the hex mumbo-jumbo in the log file
(and Realterm Terminal pane).
Here's two alternative tools to help you read the mileage from the instrument cluster of a '96-'97 Volvo 850 (or '97-'98 Volvo S70/V70/C70/XC70). Some people may find one of the following two alternatives easier to use than either: a) the semi-automated volvo850diag approach (just mentioned), or b) the manual issuing of commands to an ELM327 terminal emulator (mentioned earlier on this page). Both of these alternative solutions automatically interpret the raw mileage data into miles and/or km.
mikeri's milageread (Python source, plus link to pre-built Windows .exe), or
jonesrh's enhancements to milageread (source only)
and
2017-10-17 release info.
This utility reads the mileage and automatically displays
the mileage in plain English. There's no need for an extra,
separate interpretation step (as there is with volvo850diag).
Also, milageread helps to identify the specific reasons that likely cause particular error messages, thereby simplifying the setup process. [The 2017-10-17 release has the most accurate, most up-to-date error message analysis.]
Furthermore, milageread explicitly informs you if your purported ELM327-compatible tool is incapable of communicating via the KWPD3B0 protocol, listing each of the specific commands which your purported ELM327-compatible tool does *not* respond to correctly (if any, and which thereby make your ELM327 tool probably incapable of reading the mileage).
I believe mikeri has used milageread on both Linux and WinXP systems. I've successfully used mikeri's milageread.exe on WinXP, Win7, and Win10 systems. I've successfully used both mikeri's milageread.py Python source script and the jonesrh enhanced milageread.py Python script on my WinXP and Win7 systems [see README.txt in jonesrh supplied .zip for details on my WinXP and Win7 systems' Python and PySerial configuration].
Presumably it is possible to get milageread.py running on an iOS or MacOS system. But if you have an Android device, it is easier to just use the following "xiaotec 850 OBD-II" Android app solution to read the '96-'98 850/S70/V70 mileage.
Note: "milage" is the Norwegian spelling of "mileage".
xiaotec "850 OBD-II" Android app
(V1.1.6 -- released 2019-01-03).
XantheFIN's "Volvo 850 OBD-II" Android app can be found on
Google Play by searching for "xiaotec 850 OBD-II".
Thank you, Robert !!
That mechanism is believed to work only for '96-'97 850 with VDO instrument clusters, or '97-'98 S70/V70/C70/XC70 with Yazaki instrument clusters.If you are inclined to explore "850 OBD-II" app further, you might want to read my following analysis of that same V1.1.6 version that Robert demo-ed in the video...
Download / install / run "850 OBD-II" app from Google Play, pair your Bluetooth device, enter the app's "Settings" screen, get everything setup properly, click the triangle (Connect) icon to connect to your Bluetooth device, wait for the triangle icon to turn green, then...
Experiment with these "850 OBD-II" app's capabilities:
For those that want to do their '96-'98 850 / S70 / V70 / C70 / XC70 diagnostics of COMBI / SRS / ABS / AW50-42 / M4.4 / MSA15.7 / etc using an Android app that does the scanning and interpretation with a single button tap, xiaotec "850 OBD-II" is the only choice that I know of (as of 2021-06-07)!!! Plus, whenever the "850 OBD-II" app doesn't do what you want it to do, you can always revert to using the app's built-in ELM327 terminal emulator to manually issue AT commands, ST commands, and data requests to get the job done!
It's not perfect. But overall, the xiaotec "850 OBD-II" Android app (as of V1.1.6) has evolved to be an extremely useful and convenient tool for owners of 1996-1997 850 and 1997-1998 S70/V70/C70/XC70 !!!
Kudos, xiaotec / XantheFIN / Aleksi !!
The "850 OBD-II" app only costs $1.99. To me that seems like a pittance for those '96-'98 850/S70/V70 DIYers that use Android and need at least 1 of the 10 (xiaotec "850 OBD-II") capabilities listed above.
Note: My most recent "thorough" testing (in 2019-01) was with xiaotec "850 OBD-II" app V1.1.6 (dated 2019-01-03), downloaded from Google Play to an Android 4.4 phone, and tested with a ScanTool.net OBDLink LX Bluetooth ELM327-compatible tool.
See Volvo 850 Diagnostic Links for additional reference links.
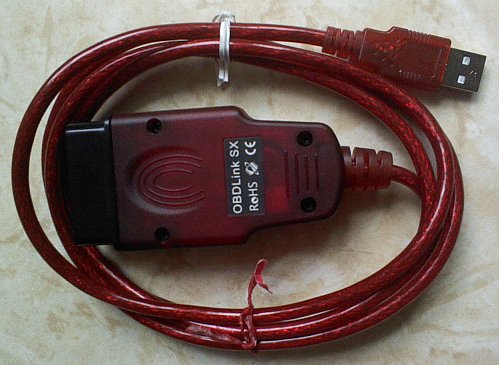
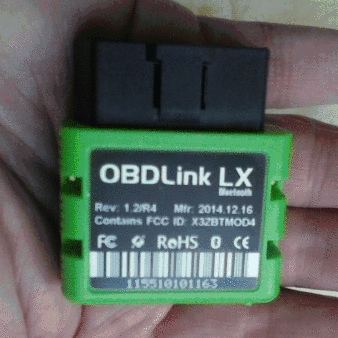